Overview
Here are some common event requests and the type of event that results:
- "I need a room next Tuesday at 10 a.m." (1 event, one booking)
- "I need a room next Tuesday and Wednesday from 8 a.m. to 5 p.m." (1 event, two bookings)
- "I need a room every Tuesday afternoon for the next two months." (1 event, eight bookings)
- "I need two rooms next Tuesday afternoon from 1 p.m. to 3 p.m." (1 event, two bookings)
- "I need a room every Sunday from 8 a.m. to 10 a.m. for the next year." (1 event, 52 bookings)
As you can see, each event is made up of one or more bookings, with a booking being a unique room/date/time combination. There is no limit to how many bookings an event can have. That said, it may make it easier to manage a large event (one with hundreds of bookings over a period of months or years) if you break it into smaller events, but that's a matter of personal preference.
Creating an event involves walking through a process in which you answer a handful of questions about the gathering:
- Who is attending?
- When is the event taking place?
- Where is it taking place?
- What is the event?
When creating a new event, you'll navigate through four parts of the process to enter information that answers the questions above (Who, When, Where, What). While a significant amount of data is entered, a user can complete the process in just a few minutes.
Here is a video on adding new events.
Quick navigation for this article:
- Part I - The Who
- Part II - The When
- Part III - The Where
- Part IV - The What
- Part I - Advanced Options - Adding Organizations and Contacts on the fly
- Part II - Advanced Options - Repeating date patterns, setup/teardown time
- Part III - Advanced Options - Best available room, conflicts, holidays, building hours
Part I - The Who
Overview
In this part of the process, you enter information about who's holding the event. This includes the organization and contact, as well as the number of people expected to attend.
Based on your system's account settings, you may be prompted for just the organization or the contact. In the examples in this article, the system requires both an organization and a contact.
To complete Part 1 of creating a new event:
1. Go to Events > Add New Event:
2. Select the organization that's hosting the event from the drop-down list. To filter the list, start typing the name of the organization. (Note: If the organization that's hosting the event hasn't been defined in Mazévo, you can add them on the fly. That process is explained at the end of this section.)
3. Select the primary contact from the drop-down list. (Note: Events can have multiple contacts.) Contacts associated with the organization are shown at the top of the list in colored italics. The remainder of the list contains all the contacts defined in the system. Optionally, select a secondary and billing contact for the event.
4. Enter the number of people attending the event. Mazévo will use this number in Part 3 to filter the list of available rooms to those that can hold this number of people. It will also be used for the overall event attendance and the default setup count for each booking. Entering a zero value ('0') will bypass the capacity check when displaying available rooms.
5. Click Next.
Adding Organizations and Contacts on the Fly
In the first part of the Add New Event process, you can take two additional actions. First, you can create a new organization on the fly if it doesn't exist, and the same is true for contacts.
To add a new organization and contact:
1. Click the drop-down arrow in the Organization or Contact field.
2. Click Add New and provide the required information.
3. Click Next.
Note that you can add an organization, a contact, or both. The item(s) you add will then be available for selection when using the Add New Event function in the future.
Part II - The When
Overview
In this section, you enter the start and end times for the event and select the date(s).
To complete Part 2 of creating an event:
1. Enter the start time and end time of the event. An event can be up 24 hours long and can cross midnight. The start and end times indicate when the customer's event will take place. The Advanced Options section below explains the process for reserving additional setup and teardown time.
2. Select the date(s) for the event by clicking on them on the calendar. Click the arrows in the upper right corner of the calendar to navigate from month to month. Select all the weekdays in a week by clicking the box to the left of the week or all of a particular day of the week by clicking the name of the day. Clear the groups of dates by clicking the box or name again. To remove individual dates, click the minus sign.
If the event occurs on a series of dates, select one of the recurrence options in the Repeat drop-down list and make entries as appropriate.
3. When you've finished selecting dates, click Next.
Here is a video on creating a recurring event.
Back to top
Advanced Options
Date patterns or repeating events
When creating a new event, several different repeating date patterns are available. They're shown in the Repeat drop-down list.
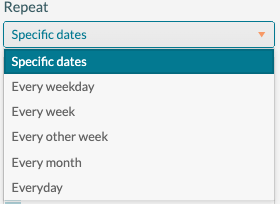
Every weekday is Monday to Friday within the date range you enter.
Every week is the selected day or days of the week for every week in the date range—for example, every Wednesday from 1/24/20 to 2/28/20.
Every other week is similar to every week but on alternating weeks.
Every month is the same day for each month in the range. The first date in the range entered is repeated, as indicated to the right of the fields.
Every day is literally every day, including weekends, between the start and end dates entered.
Overriding Default Setup and Teardown Time
Mazévo uses the setup and teardown time defined for each room by default when looking at room availability and creating the event. However, there may be times when you want to override the room's default setup and teardown time.
To do so, you check the Specify Setup Time box and enter the number of minutes of setup and teardown needed. If you set one or both times to 0 minutes, you effectively override the default for the room.
Adding Additional Time for Customer Setup
You can add extra time to the start of the booking for customer access. This additional time can be used by the customer to decorate the room before the event. To add this time, select Specify Customer Access Time and enter the required time.
Part III - The Where
Overview
The third section of the Add New Event process is about where the event will occur. You have two options for specifying your preference, which is used in conjunction with the date(s) and attendance you specified earlier.
To complete Part 3 of creating an event:
1. Select the status for the new event.
2. To search by building, click Building and click in the field to the right one or more times to select one or more buildings. To search by room tags (i.e., room characteristics you previously defined and applied to rooms), click Room Tags and click in the field to the right one or more times to select one or more room tags.
3. Click Find Rooms.
If the status selected does not block space, all rooms in the search will appear for selection.
The results show available rooms that you can select. (After pressing Find Rooms)
Mazévo displays a list of rooms that meet all of these criteria:
- They're in the buildings you selected or have the tags you selected.
- They can hold the number of people you specified. (Part 1).
- Most importantly, they're available for one or more of the selected date(s) at the time (Part 2).
If a room is not available for one or more dates, is too small, or is too large, the room will appear on the unavailable rooms tab.
More Filtering Options
When viewing this list of available rooms, you have two additional filters to help you quickly find the best room for the event.
- At the top of the list, you can enter text in the Search for a Room field, and the display is immediately filtered to the text you've typed.
- You can also filter the results to rooms that can be arranged in a particular setup style.
- You can filter the results by room feature.
1. Select one or more rooms you want to reserve for this event by using the checkboxes to the left of each room.
2. For each room selected, indicate the room setup style or click Skip if you're not ready to make that selection. You can also select Skip for All if you select multiple rooms and specify the setup later. The drop-down list shows styles defined for the room in orange italics at the top of the drop-down list that can accommodate the number of attendees you specified previously. At the bottom of the drop-down list are other room setup styles in the system that you can select for this room.
When you select a style, the system reconfirms the style setup count and allows you to enter a setup note for this room. This can be useful when selecting more than one room for an event, such as a second room for a breakout session.
5. Click Done to return to the list of rooms. An icon and the count will be displayed next to the selected room.
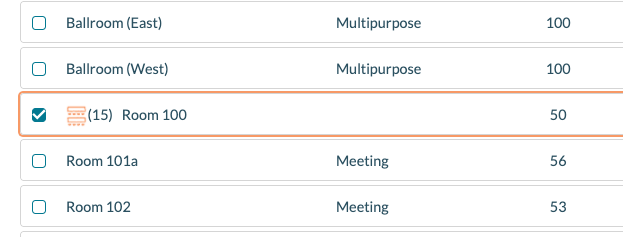
You can select more than one room on this panel, as shown below.
6. After selecting the room(s), click Next.
Advanced Options
Best Available Room
If you are creating a multi-day event, it's possible that some rooms are not available for all of the dates. In this case, Mazévo can help you find the right rooms to piece together your event. It does this by showing the number of days that each room is available in the Days Available column.
When you hover your cursor over a number, the system displays a pop-up listing the dates on which the room is unavailable.
If you click on the number of days available, the system displays a list of conflicting bookings.
This information is also presented on the Conflicts tab. Think of the Conflicts tab as the opposite of the Availability tab. The Conflicts tab shows each room that has one or more conflicts. This is useful if you're trying to put the event in a specific type of room. Hovering over the Days In Conflict number brings up a list of the dates the room is in conflict.
If you click on the Days In Conflict number, the system shows you the bookings in conflict (i.e., those blocking you from getting the room for all of the dates).
Having reviewed this information, you select a room for the event. After you select the room's setup style (see above), if the space is available fewer than the total number of dates requested, the system gives you the option to select a different room on the days in conflict, skip the date(s) in conflict and move on without selecting a room, or creating the bookings in the conflict status. No booking(s) are created if you skip the assignment.
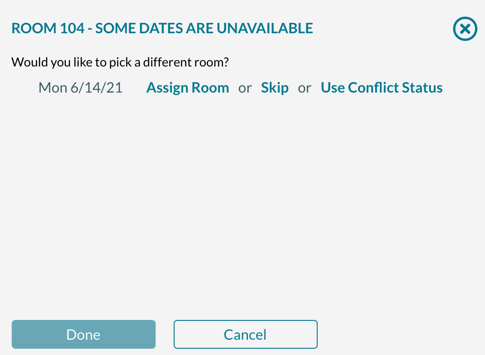
The Use Conflict Status will only appear if your system has a conflict status defined.
If you click Assign Room, Mazévo displays a list of available rooms on the conflicting date.
You then select an alternate room and click Done to continue. When you've made your selections, you click Next.
Additional Room Information
To view additional information about a room, click on the room name. A pop-up will display capacity information, setup/teardown times, notes, and an image of the room, if available.
Holidays and Building Hours
Holidays (called "special dates") and building hours are displayed on the right side of the grid of the available rooms, each in its own section. The system displays the appropriate information if you select a section by clicking its header. Only holidays and building hours for the dates being requested for this event are displayed.
If you attempt to book an event outside of building hours or when the building is closed, you will receive a warning. You can continue booking the event or stop and adjust the date(s) and time of the event.
Event planners can book outside building hours or when the building is closed. However, requesters are not allowed to do this.
Part IV - The What
Overview
The final part of the Add New Event process specifies the event name and other details before officially booking the space.
To complete Part 4 of creating an event:
1. Type or select entries for these fields:
- Event Name. Type a short descriptive name for the event.
- Event Type. If you've defined event types in your system, they are available for selection in the drop-down list.
- Event Coordinator. If there is one, the coordinator will default to the value set for the organization. If there is no default or you need to change the coordinator for this event, select one from the dropdown box.
- Private Event. You can mark the entire event as private so it does not appear on the public calendar.
- VIP Event. You can mark the event as a VIP.
- Pricing Plan. A default plan will be displayed if you have pricing set up in the system. You can override it by selecting a different plan from the drop-down list.
- Apply Taxes. This box may be checked by default. However, you can override it by clearing the box.
- Apply Service Charges. This box may be checked by default. You can override it by clearing the box.
- Billing Code. If you've specified a billing code for the organization, it is shown here by default. You can override it if you choose to by typing a new number.
2. Click Book Room(s) to create the event. The system then shows you the event, and you can make additions (like reserving resources) or changes as appropriate.