Overview
Scheduled emails make automating communications between the event staff and your customers easy. They are typically used to send reminders about an upcoming event or even a post-event survey to gather information on customer satisfaction.
Scheduled emails are tied to events and can automatically be created when an event is created. Email creation can be based on several different triggers, such as location, event type, services, or event size (attendance), or event planners can manually create emails for an event.
Setting a Reply-To email address for all scheduled emails
From the main Scheduled Emails screen, click on Set Reply To Email and enter an email address.

To define a new scheduled email:
1. Go to Settings > Scheduled Emails.
2. Click Add Scheduled Email.

3. Enter the email's Description. This description will only be used/seen by Event Planners.
4. Enter a Reply-to Email address for this scheduled email. This will override the global reply-to email set on the main Scheduled Email Screen.
5. Enter the Subject line and Message body. The subject line and message can include the following variables:
- {{eventName}} - Substitutes the event name.
- {{eventNumber}} - Substitutes the event id.
- {{organization}} - Substitutes the organization name.
- {{firstBookingDate}} - Substitutes the date of the first booking.
- {{lastBookingDate}} - Substitutes the date of the last booking.
- {{firstBookingStartTime}} - Substitutes the start time of the first booking.
- {{firstBookingEndTime}} - Substitutes the end time of the first booking.
- {{firstBookingRoom}} - Substitutes the room of the first booking.
If you are sending emails before each booking, the variables are as follows: - {{eventName}} - Substitutes the event name.
- {{eventNumber}} - Substitutes the event id.
- {{organization}} - Substitutes the organization name.
- {{bookingDate}} - Substitutes the date of the first booking.
- {{bookingStartTime}} - Substitutes the start time of the first booking.
- {{bookingEndTime}} - Substitutes the end time of the first booking.
- {{bookingRoom}} - Substitutes the room of the first booking.
The values from the event will replace the variable name when the email is sent.
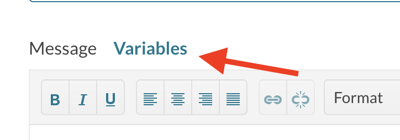
Click the Variables link for a list/legend of the available substitutions.
When you enter text into the message body, pressing the Return key will start a new paragraph, adding space at the beginning of the paragraph. Pressing Shift+Return will not add the additional line spacing.
6. On the Contacts tab, select the recipient(s) for the email. There are four options to choose from:
- Primary Contact
- Secondary Contacts
- Billing Contacts
- Manually entered email address
7. On the trigger tab, select the Scheduled Email Trigger. There are six options to choose from:
- Manual. This type of email must be manually added to the event using the event editor.
- Always. The email is created for all new events when the event is created.
- Location. A new email is created if the event has bookings in the selected buildings or room tags. The system displays a new tab if you choose this trigger type, and you can opt to use buildings or room tags and select or search for the desired items.
- Service. A new email is created if the event has services associated with the selected service providers or resource tags. The system displays a tab where you can select or search for items.
- Event Type. A new email is created if the event has an event type selected from the list.
- Organization Type. A new email is created if the event has an organization of this type.
- Attendance. If you select this trigger type, you indicate the attendance that causes the email to be created.
For all trigger types except Manual, you can limit the trigger by the booking status. For example, you may want to schedule an email for all confirmed bookings in Building 1.
You can further limit the email by buildings or room tags by checking the location checkbox for Service, Event Type, Organization Type, and Attendance trigger types.
8. Select the Scheduled For calculation method and enter the number of days. There are five options to choose from:
- None. The scheduled date is set to today.
- Days Before the Event. The system calculates the scheduled send date as the days before the earliest booking date.
- Days After the Event. Mazévo calculates the scheduled send date as the days after the last booking date.
- Days Before Each Booking. The system calculates the scheduled send date as the days before each booking. Each booking will receive one email before the booking date.
- Days After Each Booking. The system calculates the scheduled send date as the days after each booking. Each booking will receive one email after the booking date.
- Days Before Each Date. The system calculates the scheduled send date as the days before each booking date on the event. Bookings on the same date will appear in one combined email.
- Days After Event Created. The system calculates the scheduled send date as days after the event is created.
If the date of an event's first or last booking is changed, Mazévo will update the scheduled email send date if an event planner has not manually changed it.
9. Select the booking Statuses to be applied to this trigger. Status is not an option for the manually triggered email.
10. Check Include Confirmation to add a link to the confirmation/BEO to the email body. Selecting this will present another tab allowing you to select the confirmation template, header, and footing messages.
11. On the Documents tab, upload any documents to be added as attachments to the email.
12. Press Save.
For additional information on scheduled emails, see Overview of Scheduled Emails.