Overview
Confirmation templates are used to customize the information displayed in the confirmation heading and the service providers to be included on the confirmation. The heading details include the department name, address, email address, phone number, and confirmation title.
It's desirable to change the title of the confirmation in some circumstances. For example, you might want it to say:
- Permit
- Quote
- Special Request
There are two formats available for a template:
- Confirmation - displays all selected bookings and resources continuously down the page.
- Banquet Event Order - displays one booking per page with the select service providers.
Confirmation templates are similar to invoicing departments in that they are also used to customize the confirmation heading.
To create a confirmation template:
- Go to Settings > Events > Confirmation Templates.
- Click Add Confirmation Template.
- On the Details tab, enter:

- Type the Name and other optional information if appropriate.
- If you want a copy of this confirmation to be sent BCC'd to the email address, check BCC When Emailing Confirmations. By default, when sending a confirmation or BEO, the sender is automatically BCC'd. A user can opt out of the BCC under User Profiles and Preferences.
- Select the Report Type to be generated from Confirmation or Banquet Event Order.
- On the Options tab, select:
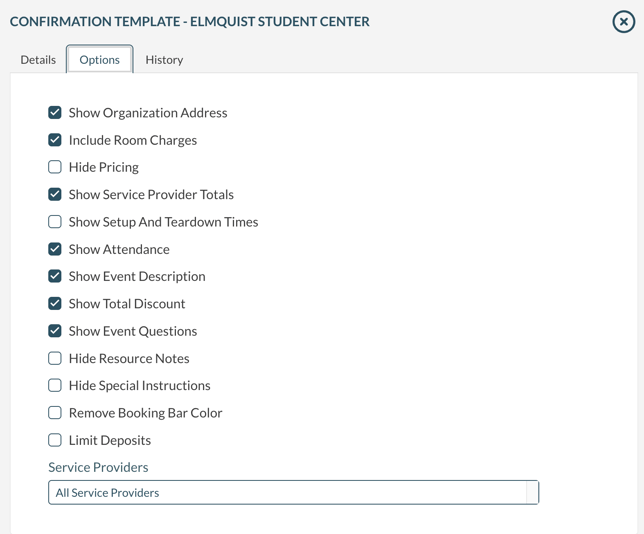
- Check Show Organization Address to display the customer's address in the heading.
- To display or suppress Room Charges, set Include Room Charges appropriately.
- To hide all pricing on the Confirmation or BEO, select Hide Pricing.
- To include a summary of charges by each service provider, select Show Service Provider Totals.
- To display setup and teardown times on the Confirmation or BEO, select Show Setup and Teardown Times.
- To display the overall event attendance, check Show Attendance.
- To display the Event Description, check Show Event Description. Event Description is a setting that Mazevo Support can turn on for your installation.
- To display the total discount amount, check Show Total Discount.
- To display the event questions in the heading, check Show Event Questions. All questions will be displayed.
- To turn off the display of the resource notes, check Hide Resource Notes. Resource notes are the descriptive text defined on a resource.
- To turn off the display of the special instructions entered for a resource check Hide Special Instructions. Special instructions are the notes/comments entered by the event planner or requester when adding a resource to a booking.
- To remove the color background for each booking, check Remove Booking Bar Color.
- To limit deposits to a specific invoicing department, check Limit Deposits and select an Invoicing Department. Leaving this unchecked will include all unapplied deposits on the confirmation.
- You can set the list of service providers displayed on the output by selecting the providers to include. By default, all providers are included in the output.
- Click Save.
Once an entry has been saved, it appears in a list of confirmation templates when users send a confirmation or generate a PDF.
If you want to display the organization's (your customer's) address on the confirmation, you can check Show Organization Address.